Agrinho: Unreal Engine with Live capture — part1
Agrinho is a fictional character from SENAR. This project is a Digital Puppet, a digital character controlled by a human actor in real time.
I was invited by Chroma Garden to create the project, that took place in the client´s annual event. All was made with Unreal Engine and Faceware live capture.
Here´s the FIRST part of the breakdown.
I will explain the concept and the character creation.

Final Result
Character control can be done in many ways: mechanical controllers like robotic gloves, capture motion sensors, and even video game controls. Each alternative has its advantages and disadvantages.
The first time we didn´t know how we could do that. We had to do a lot of research.
You can see in the video the resume of all the process and the character in action.
Briefing
The character chosen for the Chroma Garden project was Agrinho. He is a teenage boy, and represents an agricultural incentive program for the state of Paraná / Brazil. He is a link between the cclient and their target audience (the children). Our goal was to create the digital version of Agrinho to interact with children during the client’s annual event.
He would be displayed on a 3x2m LED panel at floor level. Should be able to talk to the kids in real time for at least 1 hour.

References
Our references came mainly from Disney’s Digital Puppets. They have a show in Walt Disney World with the Monsters Inc chars and another with the Nemo´movie Turtel.
The interaction they can achieve with the audience is inspiring and the character movements, altought done in real time are very convencing and fluent. Just withe careful analysis we can visualize animation patterns. Mainly for children this is not a problem. With the fluency of the conversations and the excellent performance of the actor the public can engange without noticing any errors.


Our team size and know-how does not compare to the geniuses of Disney. For this reason we had to understand our ability to produce something as similar as possible, emphasizing the user experience. Our limitations were:
– size of the team: particularly one-guy-team. I would create the most of the project alone.
– the costs: the project budget was very limited. I could not rely on expensive software and hardware.
– knowhow: our team didnt have a programmer. Iam a artist and my programming knowledge isbasic.
– deadline: we had 3 months to develop the entire project. From character creation, level setup, programming, testing, reviewing and rehearsing with actor.
Research
Our first step was to do an intensive research about tools and methods how to create a Digital Puppet. The was the main research pool, and can provide many answers quicly. So many answers that lead us to a lot of information. The possibilities were many.
Due to the costs, mainly, we decided to rely on a software solution. We would capture the actor face through camera and transfer the date to the characters face. All other animations that didnt include the facial expressions and head positiion/rotation would be controlled by joystic input.
The first interesting option we found that would serve us well was the Faceshift. However, this software was bought by Apple, and I think it was discontinued. The site is no longer available (read here). By the time of the project and our first option was no longer an option.
Then we found Faceware. This great Software solution can capture live the actor facial expressions with an easy setup. And, there is more. Faceware Live have plugins to work with Unity and Unreal Engine.
I will talk more about the implementation in the next breakdown parts.
The character
The references of the character Agrinho are diverse. Several illustrations by different people created a lack of standard. In addition the character himself has appeared in other client events.
The client couldnt tell wich of the illustrations should be the reference for the Agrinho. So he just decided that Agrinho should look more like costume that the actor dressed in events. Clearly the costume wasnt a good reference for a 3D character. It has a big and long head with no neck. That would get us some issues at the animation stage.
To help create a pattern for the character, I invited my friend Roberto Cahali, from Chroma Garden, to create a character sheet. It was based on the client reference.


Modeling
The entire 3D modeling process was done in Modo. I really like Modo because of its very intuitive and fast. I used reference images, to reproduce the character sheet.
I started with a very low base mesh. In this phase I positioned the important lines in place: eyes line, nose and ears line, torso line and so on. It was a poly by poly modeling process but I also used the Brush tools from Modo to arrange the proportions more fluidly.
Speaking about proportions, I soon realized (not the first time) that not everything that works in 2D will work in 3D.
Following the reference, very soon the model looked very strange. I already realized in the characther sheet that we would get animation problems with the model. But now I was seeing that the model, even still, looked weird. It was not like a happy boy. It was more like a big head costume.


The version I sent to the client is a adaptation from the reference. Not the Agrinho costume looking. But I was surprised when the client complained that the character was not Agrinho. Well, it´s hard to have a standart with a lot of references and styles.
They really wanted the Agrinho like the costume. Clearly the client could not understand the problems that those proportions would cause in a 3D character. So I tried to argue with the client about visual appeal. Explaining that a character like the costume would not animate well and could not be so expressive.
To my surprise again, the client understood my point of and accepted my model, with a few adjustments. This model would be very accepted for everyone. By the client and by the public.
From that moment I moved to finish the model, with uvs. I sent the sneakers to Zbrush to get some more refined details. Unfortunately these details would not appear in the final video, but it was fun doing it.

Texturing
For the textures and colors I used as a reference the concept from the client. He wears a green and yellow shirt (the colors of Brazil), a blue shorts, red tennis and has a 3-color hair.
In the case of this real-time application, there was no need to worry about the size of the textures. Because we were just creating one character, in a very small setting. So, I created 1 material for each part of the character: body, hair, shirt, shorts, socks and tennis. Each one with its particular UV.
I used the PBR workflow, with Base Color, Metalness, Roughness and Normal maps for each material. In some cases I also used an AO map.
For the creation of all the textures, I used the Substance Painter. Incredibly practical and fast. All of them were hand-painted, with some textures applied with blend.
For the skin, I used the Unreal Engine’s Subsurface Scatter shader. Great for skin shading. I’ll tell more about the setup of the materials inside the engine in the second part of the breakdown.


Rigging and Animation
The Rigging and Animation was done by Luiz Kowalski.
He is a great animator, and did this entire process in Blender.
As the face expressions and head transformations would be controlled by live capture, the only animations that were needed were the body animations.
During the process no keyframes were assigned to the head bone.
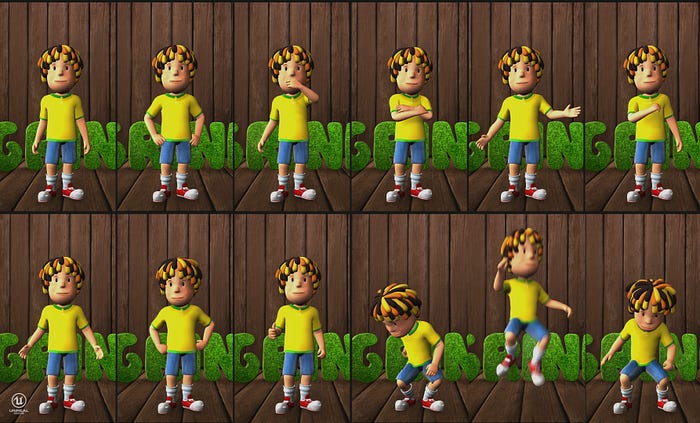
There were specific animations like sending kiss and jumping, that plays from start to end.
Walking was animated with the character fixed in the position. The char moving in the scenario was made in Unreal Engine.
Another animations was using with loop, as long the actor were holding the button. Like waving, and hand expressions.
I will explain more about the setup in the Breakdown part 2.
Breakdown 1 — Final thoughts
This concludes the Breakdown part 1. This part was focused in the research and character creation process.
I didn´t talk too much about the Unreal Engine on purpose.
That will be the main theme of part 2, where I will explain how I created the scene, imported the character, ahd connected the dots to make him playable.
There´s so much to cover. For sure the part 2 will be larger than this one.
As soon as I can it will be online in the site.
Thank you for reading this far.
Please leave any comments as you want.
— -
Thanks
Luccas Schmigel
www.lmigel.com